Friday, October 31, 2014

Apple Dumplings... There's a theme here, can you tell?

Happy Halloween! Sorry for the delay in posting. We're down to the wire here, last few days of the month, and I still only have apples in my fridge.

Well, actually, now I don't even have that, because I used them. Good thing I get paid tomorrow, right? :)

Today, I made "Southern-style" apple dumplings. I deviated from this recipe a bit too, but not too much. And they were definitely delicious!

  1. Use an apple cutter to core and cut an apple into eight slices. Peel the slices. This totally brought out the Montessori kid in me. I love my apple slicer- it was one of the things on my "must buy" list when I started college! However, I did totally forget to peel the slices- it didn't really affect the taste, though.
  2. Open can of crescent rolls, and unroll. Place apple slice at one end of crescent triangle and roll up. I added some brown sugar and cinnamon to the inside of the crescent, to add some flavor to the apples. If you can't tell yet, I love brown sugar.
  3. Before rolling.
  4. Place apple rolls into an 8x8 (of 9x9) greased pan. So far, the #1 thing I've learned about cooking is that lining the pan really helps with cleanup. Seeing as I was using another sugar-and-butter sauce, and soda in this recipe, I thought I should probably line the pan again. 
    It's OK if they're close together!
  5. In a small bowl, melt 1 stick of butter, 3/4 cup of sugar, 1 1/2 tbsp of flour, and 1/2 tsp of cinnamon. This is the first time I used my microwave, which is a hand-me-down from my parents from when they got married. Because, of course, #safety and #radiationprotection. Also, this mixture turned out pretty thick. I triple-checked every measurement, because I thought that it was maybe too much. Next time I make this, I'm going to add a little butter and sugar, and maybe only do one tbsp of flour. I also added pumpkin pie spice, because I don't have regular cinnamon. 
  6. Spoon mixture over each crescent. You're definitely going to need to spoon it, because it's too thick to pour. Also, next time I might just double the amount I make. Because of how thick it was, there wasn't enough to entirely coat each crescent.
    Before baking
  7. Pour 6 oz of sprite in the open space in the middle of the pan, NOT over the crescents. He BOLDED that part of the instructions, so it seemed important.
  8. Bake at 350 degrees for 30 to 40 minutes, or until golden brown. I had to bake these the full 40 minutes, and then turned out great.
    All done!
    These were SO. GOOD. Almost better than the caramel apple blooming onion, but not quite. I would definitely double the sauce next time, but these tasted great. Fantastic warm, and even better cold this morning for breakfast. The sprite makes the bottoms a little soggy- you definitely need to put these in a bowl or a plate that's not entirely flat, like the plates I have, because they're a little runny. 
Today I'm going grocery shopping for the entire month of November. I have most of my recipes for the month planned out, but I'm always open to suggestions and I have a little bit of wiggle room! If you have any specific recipe or technique you would like to see, comment below or email me at dontexpectmiraclesblog@gmail.com, and I will do my best to attempt it! I'll post again on Tuesday with an attempt at one of the staples of my extended family gatherings- a diet-friendly entree my Grandma calls "Chicken Fiesta". Thanks for reading!

Original Recipe: http://southernbite.com/2011/12/06/apple-dumplings/ 

Tuesday, October 28, 2014

Brrr... It's Chili Out!

Sorry. I know. The pun. It's bad.

In weather that could only happen in Minnesota, yesterday was a beautiful 75 degrees. Today was barely 40. Luckily, I had already planned to make chili tonight, which, as it just so happens, is my favorite thing to eat on cold days!

Last year, when I still lived in a dorm, my kitchen tools were limited to a single pot and an electric griddle, between the two of which I made nearly all of the food I ate that entire year. With my limited cooking talent and experience, that meant that I was eating some sort of pasta, or my dad's chili. When he sent me his recipe in September, I followed it exactly. As the year went on, I grew a little bolder- by my own standards, mind you- and changed it up. So today, I'll be giving you MY version of that recipe.

This recipe will make you more than two pounds of chili- more than enough. Tonight, I halved that, so the pictures will reflect a smaller amount. Usually I make the full amount, and freeze most of it so I can have it throughout the month.

For this recipe, you will need:

  • 1 3/4- 2 Pounds of Ground Beef
  • 2 Bell Peppers
  • 1 Sweet Onion
  • 1/2 cup of water
  • 2 Packets of Taco Mix, whichever degree of spiciness you prefer
  • 2 Packets of Fajita Mix
  • 2-3 Tablespoons of Brown Sugar (wow, I use a lot of brown sugar when I cook...)
  • 2 Cans of Diced Tomatoes
Optional: If you so desire, you can add in some beans. I am not a fan of beans in my chili, but my Dad uses them in his recipe. He recommends:
  • 1 Can Beans
  • 1 Can Kidney Beans
Let's get to the recipe.
  1. Brown and ground beef in a large pan. Drain. Remember NOT to drain into the sink- pour the grease into the garbage over paper towels. Don't drain it entirely, either. You want a little bit of grease to still be in the pan. 

  2. Transfer the beef to a large stockpot. Add in the peppers and onion, chopped. Usually I chop the pieces pretty roughly, until one day I realized I wanted smaller chunks, especially of the onion. For reference, here's the pepper I used today:
    Before you ask, yes, I washed the penny first
  3. Set burner to a medium heat. Let sit for 5-10 minutes. Stir once a minute. If I'm using the full two pounds of beef, I let it sit for the full ten minutes. If I'm only using one pound, I will only let it sit for five.
    After adding the spice packets
  4. Add the seasoning packets, pouring the water over them after all have been added to the beef. Stir. After the beef has changed color, mix in the brown sugar. I like my chili to be spicy, so I use a medium level spiciness, as well as mixing with the fajita mix. However, if you don't like this, you can decrease the spiciness or not add the full four packets. 
  5. Decrease the heat by half. Let sit for 5-10 minutes. At this step, I let it sit for the full ten minutes, no matter how much beef I'm using.
  6. Add both of the entire cans of diced tomatoes. Do not attempt to drain the water out of the can before adding. In tonight's attempt, the tomatoes were so red that there was no way they could have randomly occurred in nature. That made me feel safe. :) Mix into the chili.
    After adding the tomatoes.
    You can't tell how red it was from this picture...
  7. Reduce to a low heat. Let simmer for 20 minutes. Again, no matter how much beef I'm using, I let it simmer for the full time. When you only use diced tomatoes, rather than also adding in tomato sauce (like my Dad does), the chili needs to thicken up, and this twenty minutes is perfect for that. 
  8. Enjoy! Add your favorite chili topping, whatever it is. I've had this chili with Fritos, oyster crackers, cheese, sour cream, bacon bits- whatever floats your boat. Though, if I'm be honest, I prefer to eat it plain!
Optional: 
  • Between steps 6 and 7 is when you would add both cans of beans, if you felt so inclined (yuck). 

This is my first personal recipe I've posted- hopefully, as I learn how to cook, there will be many more to come. I love making this chili, because it's nice to be able to cook something of substance, rather than pasta or break-and-bake cookies. If you freeze it, it's easy to reheat. Usually I'll either defrost it over a day while I'm at school and throw it in a pot for a few minutes with about 1/4 of a cup of water, or I throw it into my super-tiny crock pot (OK, I lied, I had three kitchen tools) on high for about two hours. Either way, it's just as delicious then as it is right after cooking!

The month ends this weekend, and because I thought ahead like an adult and made a plan, I have a whole bunch of recipes to try in November. I'll post again on tuesday with an attempt at one of the staples of my extended family gatherings- a diet-friendly entree my Grandma calls "Chicken Fiesta". If you have any specific recipe or technique you would like to see, comment below or email me at dontexpectmiraclesblog@gmail.com, and I will do my best to attempt it! Thanks for reading!

Thursday, October 23, 2014

"World's Best Chicken" is Tough to Make With Frozen Poultry From the World's Worst Vendor

Alright, full disclosure: I've made this chicken before, so technically, it's not a "new" recipe that I'm trying. However, it might as well have been, because it didn't turn out anything like the other times I've made it. #whoops.

This recipe is SUPER easy, and tastes amazing. Even tonight, though it didn't look like it normally does, it still tasted fantastic.

I halved the recipe, since I was only cooking for myself. It really only requires three ingredients, besides the chicken. And oh good lord, the chicken.

I think that's went wrong, honestly. Last time I made this, I had fresh chicken and made it the day I bought it. This time, I used frozen chicken breasts from a bag, and the two breasts took two full days to defrost. Two. Days. I'd always heard that fresh versus frozen makes a huge difference, but I didn't fully realize it till tonight.

Here's the recipe. After the torturous two-day defrosting debacle, it took me all of five minutes to mix together the sauce, put it on the chicken, and put the chicken in the oven. And even then, it only took thirty-five minutes to bake.


  1. Preheat oven to 425 degrees.
  2. In a small bowl, whisk together 1/2 cup of dijon mustard, 1/8 cup of syrup (yes, like the kind you put on pancakes!) and 1 tablespoon red wine vinegar. Last time I made this, I substituted balsamic vinegar for the red wine vinegar, and I was happy with the result. I did the same this time. This time, the mixture was a little darker than normal, probably because I didn't use quite enough mustard.
    I whisked the whole mix in this one measuring cup
  3. Place the chicken breasts into a 9 x 13 lined baking dish. Season with salt and lots of pepper. Lining the pan is so important. The sauce is messy and runny and horrible to clean up. Much easier to just roll up the tin foil after you're done. 
  4. Pour mustard mixture over chicken. Make sure each breast is coated. Put some more pepper on, if you please. 
    The chicken before baking. Coat the entire breast!
  5. Bake for 30-40 minutes, or until the meat thermometer reads 165 degrees. The meat thermometer for mine read 165 right at 35 minutes, but the chicken still looked a little pink so I flipped it over, and brushed the excess mixture back over it, and popped it back in the oven for five more minutes.
  6. Season with fresh rosemary. Yeah, I don't have that, so I skipped this. But I've had it with it and it's a nice touch. 
Like usual, this chicken tasted amazing. You wouldn't think that those three things- mustard, syrup, and balsamic- would tasted good together, but it truly is amazing. I would recommend this recipe to anyone because of how easy and delicious it is. The only issue I had tonight was that the mix didn't take to the chicken as well as it normally does- again, I think between the crappy Walmart frozen breasts and the slight lack of mustard definitely affected the outcome. But otherwise, this was the perfect quick meal for me to make after six straight hours of school today. 

This weekend, I'm planning on doing a little grocery shopping (like a grownup) so that I have more food than apples and frozen chicken (because again, I'm a grownup). I'll post again on Tuesday with my take on my Dad's super-secret, super-special, extra-delicious chili recipe. If you have any specific recipe or technique you would like to see, comment below or email me at dontexpectmiraclesblog@gmail.com, and I will do my best to attempt it! Thanks for reading!


Here's the original recipe: http://rachelschultz.com/2012/07/11/worlds-best-chicken/

Tuesday, October 21, 2014

All I have are apples. I should go grocery shopping.

With midterms finally behind me, I feel like now I can really enjoy fall. It is Minnesota after all, so fall is a two or three week period between boiling hot and chilled-to-the-bone cold. And the cold is definitely coming- I was glad I'd brought gloves on the bike ride home.

Fall weather calls for a certain kind of food- #PSL, anyone? ;) My fall staple is apple, apple ANYTHING. So today, when I was surfing through Pinterest and found the caramel apple equivalent of a blooming onion, I was sold.

Also, the chicken I was planning on making for tonight's post didn't defrost and the only other thing in the apartment was the previously-mentioned apples.

I'll post the link to the original poster's blog, as well as the original recipe. She includes a lot of pictures that I won't, illustrating the process on a minute-by-minute basis.

This recipe is for two apples, took about 10 minutes of prep, and made my apartment smell amazing. Here's the instructions for your own apple blossoms:

  1. Preheat the oven to 375 degrees. Did that. Also had to relight my pilot light, like a grown up. Go me.
  2. Slice off the top 1/4 to 1/3 of the apples. Scoop out the core. I don't own a corer, but a small spoon did just fine.
  3. Use a thin knife to make two, deep circular cuts around the center of the apple. Next, turn the apple over and make narrow cuts all the way around the apple. Flip it back over and you can see all of the cuts. I lied, I am going to include some pictures. Sorry Jen! :)  
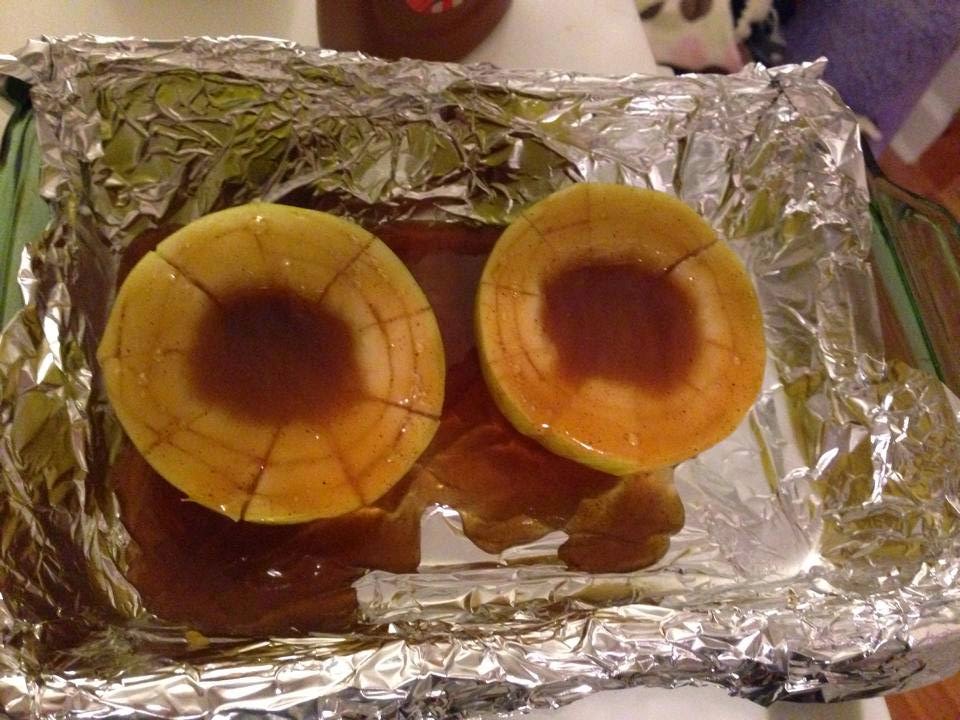
    Here's the better of the two apples after being cored and cut.
  4. Place the apples in an oven safe dish and put two caramels into the center of each apple. I used salted caramel ice cream sauce, and it worked fine.
  5. Heat 2 tablespoons of butter and three tablespoons of packed brown sugar in the microwave for 30 second, stir and continue heating for an additional 30 seconds. Remove from the microwave and stir in flour and cinnamon. Divide the mixture over the top of the two sliced apples. I did not add flour to this, because I'm still out from the bread bowl debacle. I also heated it on the stove instead. While this... sauce? glaze? Something? Whatever it is, was a bit thin without the flour, It definitely tasted good. Also, I got to use my fancy APPLE measuring spoons at this step (Thanks Mom!).
  6. Halfway through baking
    Thanks Mom :)
  7. Bake at 375 for 25-30 minutes. At the halfway point, I did take them out and spooned the sauce back over them.
  8. Remove from the oven and use a large spoon to move the apples into bowls. I cut the apples off of the core and put it into a coffee mug instead- portability is nice when you want to binge watch Gilmore Girls. And, that way I was able to pour the extra sauce/glaze/stuff on top of it. 

All in all, this went MUCH better than the bread bowls. I felt so cool making this very, very easy recipe- from the fancy cutting and coring to the sauce thing. Also, I had no idea that melting butter and brown sugar would make that sauce thing. I'm definitely going to make this again. After all, there's nothing else in my fridge. And this is semi-healthy, right? At least it has fruit in it? Whatever, it's delicious.
Look at that. Perfect for binge-watching!


A+ to this recipe, and snaps to me. While this isn't an entire meal, I was proud of how well it turned out. And so ends this (decidedly less humorous, sorry!) post, with to minutes to spare! I'll post again on Thursday, with a four-ingredient chicken recipe that is to die for, courtesy of my friend Matt.  If you have any specific recipe or technique you would like to see, comment below or email me at dontexpectmiraclesblog@gmail.com, and I will do my best to attempt it! Thanks for reading!

Here's the original recipe: http://www.thegunnysack.com/2014/09/bloomin-baked-apples-recipe.html

Friday, October 17, 2014

First Attempts- Bread is easy, right?

So today, I was craving tomato soup in a bread bowl. Back when I lived in the NW Suburbs of Chicago, there were Panera Breads all over the place. Now the closest one is at least a half hour away- and I do not have that kind of gas money.

When I was home this summer, my mom was cleaning out our cabinets and gifted me all of the baking ingredients in the house- I'm not the only one who doesn't cook in my family. I stored it in my own kitchen at school, and forgot all about it until I was lamenting the absence of bread bowls in my life.

Perfect, I thought. Bread is easy, I made that in preschool! Great first blog opportunity. It'll be perfect and in me will awaken a natural chef and I will never have to pay $8 for a bread bowl again because mine will be so much better.

L O L nope.

Here is the tale of my first attempt at really cooking. Enjoy!

I used a copycat recipe off of justapinch, which I'll attach at the bottom. It seemed fairly simple, though a tad bit time-consuming due to the yeast. But other than that, it seemed easy enough. Flour, Water. Yeast. Salt. Sugar. Egg white for a wash.


  1. Mix 2 1/2 cups of water with 1 tsp of sugar in a large bowl. Add 2 packets of active dry yeast and let stand 5-8 minutes until foamy. Yeast is weird, guys. It smells gross and it looks even worse. Luckily you don't have to deal with it for all that long.
  2. Add 2 tsp of salt, 2 tbsp of olive oil, and 4 cups of flour to the yeast mixture. Mix until thoroughly combined. The recipe says to use an electric mixer if you have one, but it was definitely easy enough to mix by hand. Also, this way, you only use one bowl! As my friends know, I hate dishes, so the less I have to clean, the better. 
  3. Add in the remaining 3 cups of flour, 1/2 a cup at a time. Mix well after each addition, about 45 seconds on medium speed, or two minutes by hand. If using an electric mixer, switch from the paddle attachment to dough hook.
  4. When the dough has pulled together, turn it out onto a lightly floured surface and knead until smooth and elastic, about six minutes. I did not anticipate how sticky dough would be. My hands looked like the hands of some sort of bread monster. I also did not anticipate how much I would enjoy kneading- kneading is fun! It's a great way to take out energy. It's surprisingly physical. Or maybe I'm just horrible at it. :) Either way, I would say that kneading the dough was my favorite part of this recipe.
  5. Lightly oil a large bowl (whoops, didn't do that), place the dough in the bowl and turn to coat with oil (didn't do that either). Cover with a damp cloth and let rise in a warm place until doubled in volume, about 40 minutes. Ok, so I didn't follow the directions exactly. I don't think that affected it too much though- the oil seemed to be more for keeping the dough from sticking to the bowl than for anything else. I also have pictures of what it looked like before and after rising! 
  6. Remove the expanded dough from the bowl and punch it down. Divide into eight equal portions. Also a very fun part. It reminded me of being a kid and playing with play dough. 
  7.  Shape each of the portion into a round bowl shape of about 4 inches, and then place on two parchment lined baking sheets. This is the part I started doubting the recipe. While there's definitely a lot of dough, there was no way that the eight sections made eight four-inch-round balls. However, having never worked with yeast before, I thought that maybe it would resolve itself in the actual baking process. Also, I didn't use baking sheets- I don't own any! Instead, I used the glass pyrex pans I bought at a garage sale. 
  8. Cover and place in an area that is free of drafts, and let rise until doubled in size, about 40 minutes. Again, I followed these directions. I waited even longer than 40 minutes. The rolls grew, but still not enough that it met the size suggestion of 4 inches round.
  9. Place two racks in the bottom and middle positions, preheat to 400 degrees fahrenheit.P
  10. Beat 1 egg white with a tablespoon of water, and lightly brush the tops of the bread bowls with half of the mixture. 
  11. Bake for 15 minutes, and then brush on the remaining egg white. When returning to the oven, reverse the baking sheets. Make sure to do the reversing! my oven is older and small, and otherwise these wouldn't have baked evenly.
  12. Bake for an additional 15 to 18 minutes, or until golden brown. Remove from oven and allow to cool on wire racks. 
And that's when I stopped following the recipe. The "bowls" never grew in size in the oven- had I made six bowls, or four, rather than eight, I'm sure they would've been the right size. However, these were hardly bigger than rolls you get at a restaurant. They also looked nothing like any of the pictures from the recipe- they were a light color, but rock hard- had I baked them any longer, they would've burned. After letting them cool (in the pan, not on a rack- another thing I need to buy!) they didn't even taste anything like the bread from Panera at all. All in all, I was disappointed, but hey, bread is bread! And it was good enough when I dipped it into my soup. 

Here's a picture of the "bread bowls" after baking:


So what did I learn today?

I learned that yeast is weird. I learned to follow directions very closely, or your end product will turn out differently. But, I also learned that sometimes your recipe won't give you what you think it will, and that's ok. I learned that what kind of tools you use to bake matters. I think that using a baking sheet instead of my pan might have altered the outcome. I learned that I love to knead bread.

In the next year, there will be many more chances for me to attempt making bread bowls again. I think that next time I will try a different recipe, maybe a sourdough roll. But either way, I found today that it was okay to mess up, that I am not going to suddenly be able to make a 7 course meal that five star chefs will laud as the finest they've ever tasted. My first attempt was not a disaster, but not necessarily a success. And I am so excited to try again soon! :)

From now on, I will be updating each week, twice a week, probably on Tuesdays and Thursdays. Usually there will be one new technique per week, and one new recipe. 

Do you have any specific recipe or technique you would like to see? Comment below or email me at dontexpectmiraclesblog@gmail.com, and I will do my best to attempt it! Thanks for reading!

Want to attempt today's recipe on your own? Here's the link to the original post: http://www.justapinch.com/recipes/bread/savory-bread/homemade-bread-bowls.html 
Let me know how your attempt goes!


Sunday, October 12, 2014

What Even is "Fun"?

"But.... what do you do for fun?"

I get that question a lot. I get a lot of questions a lot. Questions like, "You're how old?" (19), "You've been in college for how long?" (A year and a half- and I'll be getting my bachelor's in the spring), "You have how many spreadsheets on your computer?" (87, 46 of which relate directly to my plans for the future).

Almost all of my free time is spent dreaming about the future, of when I'll be a real "grown up" and have a "real" job and do "grown up" things. I research constantly. I have answers upon answers for nearly every question I've ever been asked, the "what are you going to do when..." questions, the "what are you doing now" questions. The only question I don't have an answer for is "what do you do for fun?"

The answer, I suppose, is depressing. I spend a lot of time on the internet, judging my Facebook friends and pinning articles on how to get the perfect winged eyeliner, a look I have never even attempted. I pride myself in my skill of sitting in front of a television for hours, binge-watching entire seasons of television shows. But I don't really do anything "fun", no hobbies meant to take up my time, nothing useful I can justify spending time on.

And recently, it's come to my attention that that might be an issue. Even my doctor has decided that I need to find some sort of constructive hobby, something where I don't feel like I'm just wasting time, and something not (entirely) based in the internet. In fact, he has even instilled a deadline in this quest for a hobby- November 1st. Of course, I've had all summer to come up with one. But I was busy
this summer- I needed to knock out another full semester's worth of classes. I couldn't possibly find a hobby.

A few weeks ago, I was on the phone with my friend discussing pancakes- one of the few foods I know how to make, albeit from a box. In fact, all of my "go-to" foods are like that- boxed mixes or pastas I can pour some kind of sauce on, meat that comes in bags pre cut that I throw in the oven and drown in dressing you'd find at a high school cafeteria. I have no idea how to cook. I only just figured out how to make popcorn on a stove and not in the microwave, and even in that I succeeding in burning almost every pot I own. In short- my Italian blood has not made me into some "natural cook". In fact, it's quite the opposite. Although, I must admit that I've never actually tried.

If in eight short months I'm going to be thrust into the "grown up" world I want so desperately to be in, I'm going to need those same "grown-up" skills. But even as hard as I try, no amount of talent at typing, filing, or tracking finances will help me if I can't cook enough to keep myself alive. Cooking is for grown-ups, after all.

So here lies the solution to my problem- I needed a hobby, had to find a hobby. I wanted it to be something productive, and being in college, something that didn't require me to spend any additional money, at least not too much. It needed to be something that I would be encouraged to do, and something I could be kept accountable through.

And that's why I'm here. This blog will make me hold myself accountable in the coming months. I will be posting my (likely disastrous) attempts at various cooking facets- from basic techniques to recipes. Hopefully, by graduation in May I'll be better at cooking than I am now!